Saturday, June 21, 2014

Ramrod holes aren't that tough

This is another job that I think gets people more uptight than it probably should.  Ramrod grooves and holes aren't hard at all so long as you approach them with a plan.

I inlet the barrel fully, then drill a pilot hole down through the channel where the entry thimble (into the fore end) will cover it up.  This gives me a clear indication of the center of the barrel channel when I flip the stock over.  I got used to doing this because on a couple of occasions I got into trouble measuring for the groove using the edges of the stock blank.  With a centered pilot hole there is no doubt where the center is.  Then, between that spot and the end of the barrel inlet I lay out the groove, and start with a round chisel, just like a barrel channel.


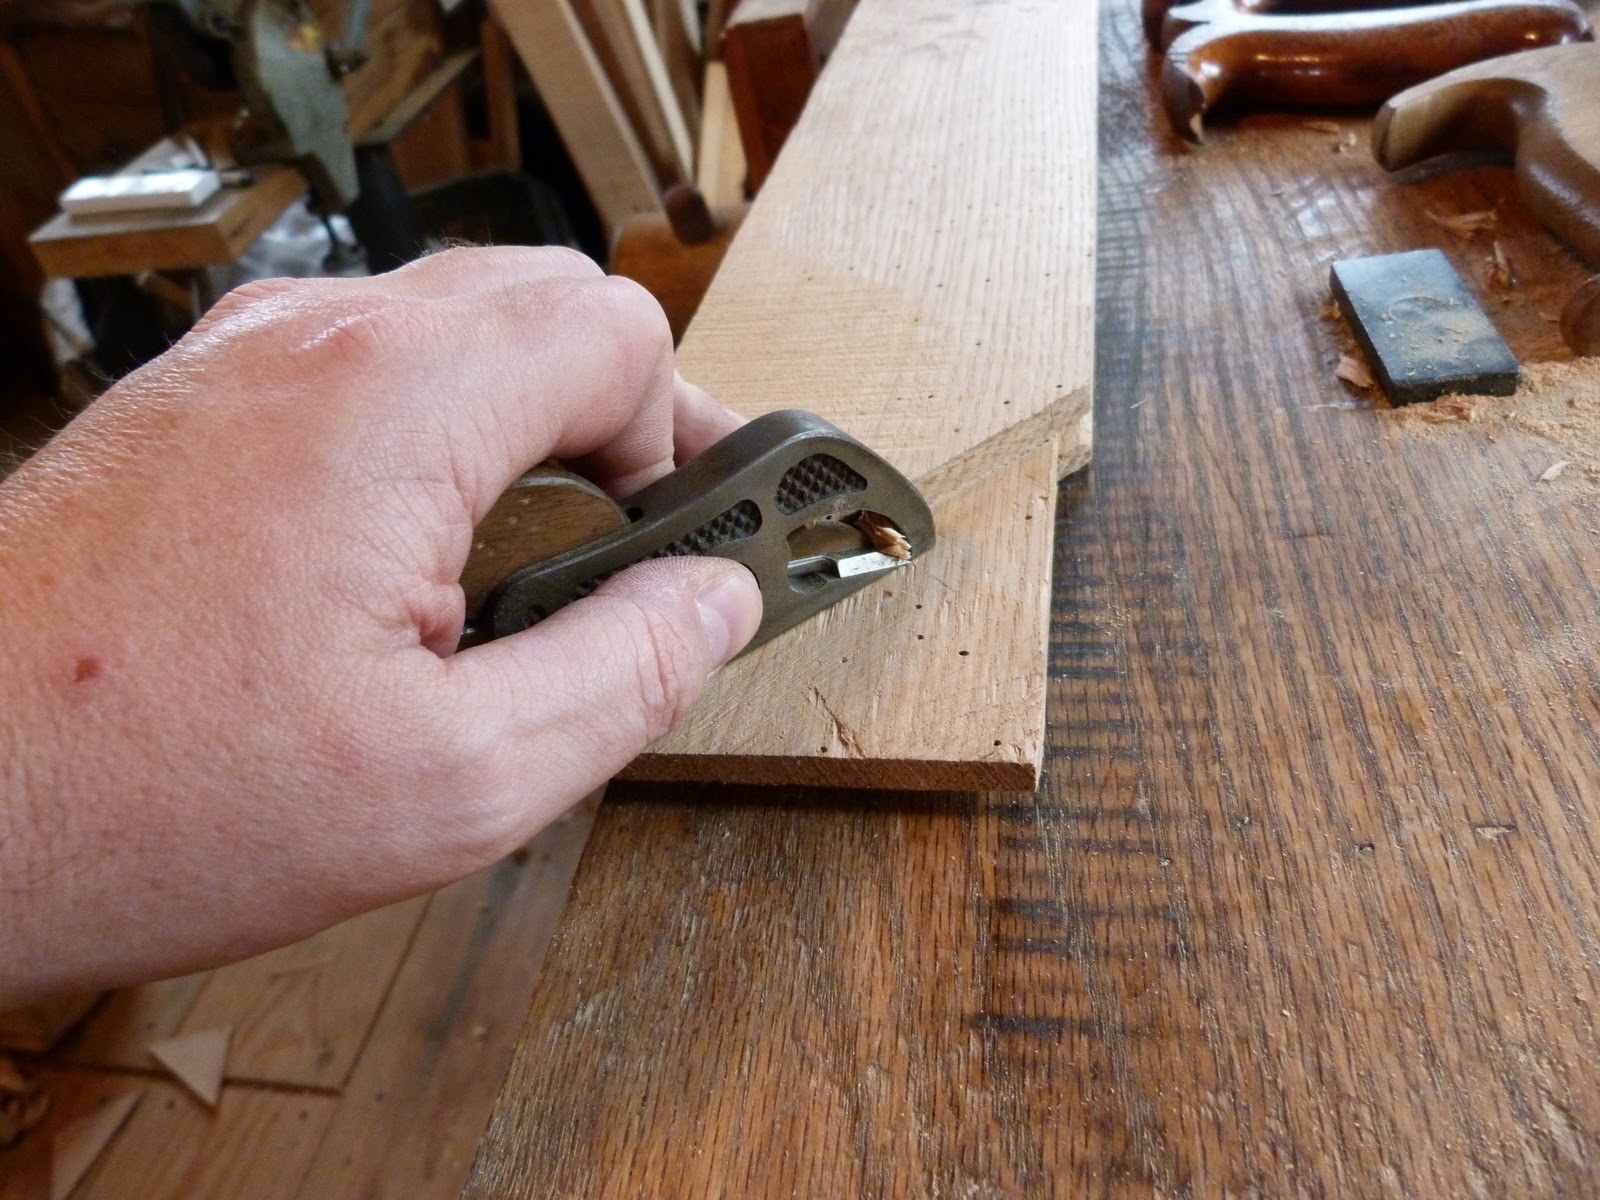
In about 5 minutes, I'm ready for the round plane which will make the groove nearly perfect.  I make sure that the depth is correct.  I always aim for a 1/8" web between barrel and ramrod, which is pretty standard.


The plane will only get so close to the plumb cut on the fore end - the rest has to be put in with a couple of round chisels.  Above you can see the gap between the end of the groove and the plumb cut.

Once the groove is in and at full depth for the whole length (this can really mess you up if it either plunges or climbs at the entry point into the forestock), it's time to drill the hole.  It gets interesting here, and scary for some people.  I've certainly messed this up in all three directions - up into the barrel channel, down and out the bottom of the stock, and off into the lock mortise.  They all mess up your day.  

You can plug and redrill.  You can put on a wear plate (probably why some of the original wear plates are there?)  You can start drilling and correct a bad hole by using a smaller bit (say a 5/16") to point you in the direction you need to go.  Or you can "aim small miss small", which is what works for me.


I have come to the conclusion that the hole will almost always go exactly where you aim it.  It may go where you WANT it to go, but it will go where you AIM it.  And I don't believe in the mumbo jumbo of special "non wandering" bits.  This is just a 3/8" wood bit welded onto a piece of straight drill rod, and it does a great job.  

Now, aiming the bit is not as simple as letting it ride in the groove, and I think this is a mistake a lot of people make.  Sight down the stock - where is the bit pointing?  Well, that's where it's going to go.  It should come as no surprise.  If I use a barrel with a significant amount of swamp in it, and maintain a 1/8" web the full length of the barrel, then I find it mandatory to bend the stock "up" in the middle - bowing it slightly - to in effect straighten out the bottom curve of the barrel inlet.  Otherwise the front flare of the swamp will get in the way.  If you keep the ramrod groove straight from muzzle to breech, to me the stock looks thick and unhandy.


Here is the stock upside down in the vices.  It gets arched up slightly so that if you sight down the lines you've drawn on the stock, they're mostly straight.  Sometimes I use the ramrod groove to guide the bit, sometimes I aim it by hand.  But wherever you aim it, I can almost guarantee you that's where it's going to go.

I hand held the bit this time - eyeballing it to miss the wide mainspring on this lock and guiding it to hopefully leave a 1/8" web at the breech.  Here is the result - it took 25 minutes from start to finish.  I was low by 1/16".  The top pencil line is the barrel channel - the next two are are where I was hoping to go, and the bottom darker black line shows the actual bottom of the ramrod hole.


It's a job that is completely manageable and I encourage you to tackle it.  I always sort of get the feeling that the rest of the rifle is "downhill" once I get the hole drilled.  Silly, when you consider how much else there is to do, but there it is.


Wednesday, June 18, 2014

Back at it...


I am going to get back in the traces after a long dry spell engaged with personal affairs.  I have several rifles in the works and have started taking a couple of orders, so I feel like I am becoming my old self again.

There is always much talk about inletting barrels.  How do you do it, who does it by hand, who uses an in letting service, etc.  Some people have no problem having it done for them, others insist on doing it themselves by hand.

I have always fallen into the latter camp.  I feel personally that when a guy buys a rifle, he is not so much buying a gun as he is a tradition...a bundle of ideas and tasks and attitudes all covered with linseed oil.  So I always felt it was important that I do as much as I could by hand.  Something as simple as rolling your own ramrod pipes still connects you in tangible ways to all aspects of the trade.  

A lot of people say this takes too much time.  I say it's time well spent...what takes too much time to me is waiting weeks and weeks on a barrel inletter to ship your stuff to you.  I will have the rifle built and out the door in that time.  Personally, I think one of the main reasons people have the barrel inlet is so that they don't have to drill the ramrod hole, which is a much feared task that has never bothered me either, but I see their point.

I started the clock at 11:59 with a barrel for a jaeger for a friend going into a really dark piece of extremely dense English walnut.  I don't use rails or fixtures or routers.  I clamp the barrel in place, taking cast off and cheek piece etc. into account, and draw it onto the top of the stock, then start with a big chisel and a a big hammer.


By 12:30 I had the entire channel chiseled out and was planing it out with m 3/4" round bottom plane.  I also have a 5/8" plane I use for smaller barrels.


By 1:00 I had the bulk of the octagonal section roughed out, and the tang mostly inlet.  This is not fine work - it doesn't need to be.  Of course the tang section must be very fine work, but other than that, rough and ready is acceptable initially.


And by 3:00 pm - 3 hours later - the job was finished.  Now, granted, this was a shorter barrel than most - 32" - and was half round/half octagon - but I know for a fact that a full length octagonal barrel only takes at most another hour and a half.  I can normally get a barrel of any kind in before lunch.  This isn't special skill on my part - it just takes wanting to do it - it only requires deciding that it will be done, and then "going ahead".  Now, three hours later, I'm ready to rough some more of the stock out and consider the butt piece and lock placement.  And it hasn't cost me a dime.


Sunday, April 3, 2011

More toolmaking: unfinished business

I started to make a side escapement plane several years ago, and it sat on the shelf, unfinished.  I need a round bottomed plane for hogging out barrel channels.  I have a 3/4" plane made by Tod Herrli that I really love, but some of the smaller swamped (tapered and flared) barrels I use are narrower than 3/4" at the waist, or the smallest diameter of the barrel.  (For those that don't know, proper 18th century form longrifle barrels are not "straight", or parallel sided - they are waisted - thickest at the breech, they taper down to a smaller diameter about 8" or so behind the muzzle, then they flare back out again.  It's imperceptible when you look at it, but it saves tremendous weight and adds great balance and lightness to the rifle.)


So, I decided to make a 5/8" round bottom plane.  Now, this is not the same as a "round" moulding plane, but a true 1/2 circle round bottom shape. 


I cut out a block of quarter sawn maple, and laid the design out pretty much identical to my other stocking planes, and you'll see a photo of one of them later on.

Now, instead of just doing the smart thing, which would have been to directly copy the plane's layout - which puts the iron of to the right edge of the plane body.  I wanted to put the iron in the center of the plane body.  Yeah, it's amateur hour - watch the clown at work.  So, needless to say, this caused problems.

I had to remove a good bit of the mortice interior on the left side, to try to fix this problem.  The iron is made so as to put the edge on the right side, where the escapement is placed.  It all worked out, but I learned a lot, let's put it that way.


I further cut back and refined the escapement.  I also opened up the throat, as you can see.  The throat as originally cut was just large enough to accept the iron, with no room for shavings.


I used a Lie Nielsen blank plane iron, 5/8" wide.  One edge of it is literally glass hard - I don't know how they make these, but most of the iron was soft and could be hacksawed and filed, but one edge literally could not be scratched by any tool I had in the shop.  It didn't effect the work in the end, and didn't require annealing.


I heated the iron to a cherry red, quenched it in the motor oil I quench everything in, which left it black.  I polished it back, and tempered it to a straw.  You can see some of the straw color on the iron.  It was difficult to photograph.


I probably won't be using maple again for a plane.  Even hard maple isn't as finely grained as beech, and all those fuzzy edges get on your nerves after a while.  I have one other block of really hard straight grained maple that I'll probably use, but after that if I do any plane making I'll buy some beech planks and glue up a body.  I don't use maple in my projects because I'm so enamored of it - I use it because I have acres of it laying around, cut up in all different sizes.  Curly maple, especially, is a hassle, and although it's attractive, it has a lot of drawbacks. 

There are books and videos on plane making, but honestly, if you want to make a plane, the best first step is to just buy a hollow or a round and copy it line for line.  By simply reproducing what you see in front of you, you'll learn a tremendous amount.  Then take the next step and learn how to lay out hollows and rounds, if you want to make your own mouldings.  Tod Herrli's DVD is really, really good, and I highly recommend it.

At the ridiculous prices most custom plane makers charge for wooden planes, there is no excuse for not making your own.  I mean, if you are intending to plane out your own built up mouldings, and you're doing work at that level and have that kind of skill set, what are you doing spending hundreds or thousands of dollars on planes that you can knock out yourself in 3-4 hours?  It really isn't hard and once you can make a plane, you've taken a big step forward in tool making independence. 

Some Tool Making

I needed to make some tools.  I don't have a try square at all, and the regular square I've been using is a big steel framing square that came out of my grandfather's tool chest.  It's overkill for 99% of what I do, and I wanted something smaller and lighter.  About this time I discovered Christopher Schwartz's very nice wooden square that is illustrated in Popular Woodworking.  It's beautiful, and I have tons ot strips of maple laying around from gun stocking - no problem at all to plane up some strips and knock this guy out.


I sawed the cheeks on the the tenon of the main junction, then put the mortice down on the bench with a hold fast and chopped out the mortice.


I dressed the mortise out with a pillar file and after several trial fits it folded together nicely.


The cross brace is laid out, the shoulders and half lap mortice cut, and then it's glued in place.  The decorative details on this square are just great - ornate and restrained.  Really nice.


I switched gears and started work on the try square.  I had a block of ebony, and if you have any ebony in your shop, you're definitely going to find uses   for it, it's such a wonderful material.

Ebony body, maple "blade" - is that what you call it?  Not rocket science. 


Pegged and glued.  Tradition calls for three, but two is plenty.  It was pretty much a perfect fit.


I nearly cut my hand on this crisply planed ebony - especially the two bottom corners.  I quickly filed on a decorative treatment that is very comfortable in the hand and looks distinctive.  Working ebony is like working brass - you want to file it and work it more like metal than wood.


Once the layout square was finised, the glue dried, and the surfaces planed and sqared, I slapped on some linseed oil mixed with varnish, colored with a few drops of alcohol stock stain, just to give it some color.  The try square I left unstained, I just used oil and varnish.

Beauty shot.  Not a bad day, and two great,versatile tools that should last a century with care, and can be remade in a few hours at no cost in the shop.  You can't beat that.


Sunday, March 27, 2011

Chest lid continued

I was able to make the central panel work by instead slightly reducing the two short end pieces of the frame, by about 1/4".  This entailed a good bit of work on the ends, which recieve the male aspects of the tongue and groove frame joinery, but less work than cutting out and planing and grooving a whole new central panel.  The lid still fits the chest just fine.


I pegged the joints but left everything un-glued for maximum mobility with humidity changes.  That is, after all, the whole purpose of going to the trouble of making this top anyway.


Planed smooth the oak pegs are nearly invisible - good looking joint.  I'm really pleased with the lid - and it's heavy.  Drop this on your hand and you're going to feel it.


I like the rough planed texture and much prefer it to a furniture quality planing job.  The 1/16" crack at the joint bugs me, but not enough to spend any more time tightening it up.  There are a lot of moving pieces at work there, and ground you gain on one end, it seems you lose on the other.


Tuesday, March 15, 2011

Underhil Tool Chest

Roy Underhill is the father of so much that is good in our hobby/lifestyle, but one of the nicest things he's cranked out recently is a design for a really fine, traditional "joiner's tool chest" designed to be built with commercially available stock.  Popular Woodworking published an article on it.  He built it on his show and those videos are available free online.  In addition, if you're a user of Google Sketchup (and if you aren't, you're really missing out on this amazing free program), then detailed plans for it are available online.  It is also illustrated and described in one of his books, I believe the most recent one, but I haven't bought it yet so can't say for sure.

Had I thought about it, I would have liked to resize it slightly longer so that it'll hold my 30" long jointer plane, but this gives me an excuse to look for another slightly shorter jointer, something I think it's obvious I badly need...  (rolls eyes) but I like the sobriety imposed on you by a not-limitless capacity.  Do you really need all those planes?  How many saws do you really need?  It goes along with my self imposed ban on tool collecting - I buy what I need, and I use what I buy.  People that have 6 different awls and a dozen back saws, or a thick roll of bench chisels graduated in 1/8" widths make me...well jealous, of course, but also slightly nervous.


The lid is a true floating panel lid which means a long groove must be cut in the end grain of the panel to ride in the grooves on the sides.  This is my tired, wonky old plough plane, but it gets the job done, mostly.  This dry oak was not easy to plough.  The end grain groove I actually rip cut - the plane just couldn't cut end grain oak. 


I started making mine out of some of the large stockpile of oak lumber I had sawn up.  I had several 12" wide boards and picked out a good one that would make all four sides, but remember this chest is designed to use commercially available lumber.  You can go to Home Depot and get oak or poplar 11 1/4" boards that are 3/4" thick, and that's what this chest is designed to be made from.  The bottom of the chest involves a really ingenious skirt board arrangement that adds functional height to the chest, making it more than 11 1/2" deep, adds significant strength, and looks uber traditional and beautiful.  It' a great design.


This is a hard project, don't let Roy's cheerful manner fool you.  The lid is a real challenge, requiring a lot of care with ripping and mortising the corners.  The dovetaling around that skirt is a real logic puzzle.  Hint: plough out the grooves first, then dovetail it together.  And do this after the sides are completely finished.  Measure from your chest, not from drawings or plans, for a proper fit.


Another hint: when making the lid, make the frame first, and assemble (temporarily) and square it up, then measure for the internal floating panel.  I did it the other way around, and now my panel is a little too small to use, even though I tried very hard to cut things precisely.  Things happen - cut yourself some slack, literally.


The small Clifton iron plane is really handy for dressing up these thin tenons.


Other than cutting out all the pieces and routing all the grooves on the skirt, this is as far as I've gotten now.  I need to recut the top panel and square up and finish assemble the top.  Next I'll dovetail the sides and skirt and will post photos of that process as I get into it.

I encourage you to try this project.  Unlike some of Roy's wonderful projects, this one has been exhaustively documented and published.  (Try finding good building plans for his treadle lathe...)  You can get good clear poplar from HD or Lowe's and you'll be rewarded with a super tool chest in a good useable size.

Peter Ross will make hinges for you.

Saw Benches

Nothing fancy, but I needed to get around to doing this.  I wanted a pair of rough, stable saw benches, but not benches so nice that I couldn't use them as a base for occasional hewing and axe shaping, which I do a bit of.  A good broad hatchet or shaping axe is a very handy tool for some of the stock shaping I do in gun work, and it's hard to find a place to do it.


I started with two large pieces off of our firewood pile.  The spring rains and winds have blown down several large oaks, and we have an embarrassment of riches in the wood pile.


I simply drilled the billets and cut legs from some 2" oak plank that warped and couldn't be used in making the bench top. 

Sawed, wedged and glued.  Good solid knee-high benches for crosscutting and ripping boards, as well as broad hatchet hewing.


I really love my Swedish hewing hatchett - toughest edge I've ever worked with.


Simple stuff, but it has to be done.  Put it off for too long.